[Linux]디스크 추가 및 파일 시스템 구성 절차
Oracle VM VirtualBox에서 디스크를 추가하고 파일 시스템을 구성하는 절차를 연습해 보겠습니다. 물리 서버에서도 동일한 절차로 파일 시스템을 구성할 수 있습니다. Logical Volume을 사용하지 않고 물리적 디스크를 2개의 파티션으로 분할해서 마운트시키겠습니다.
- 설치된 디스크 확인
- VM을 선택하고 “설정 > 저장소” 페이지로 이동. SATA 컨트롤러에 1개의 디스크가 있습니다.
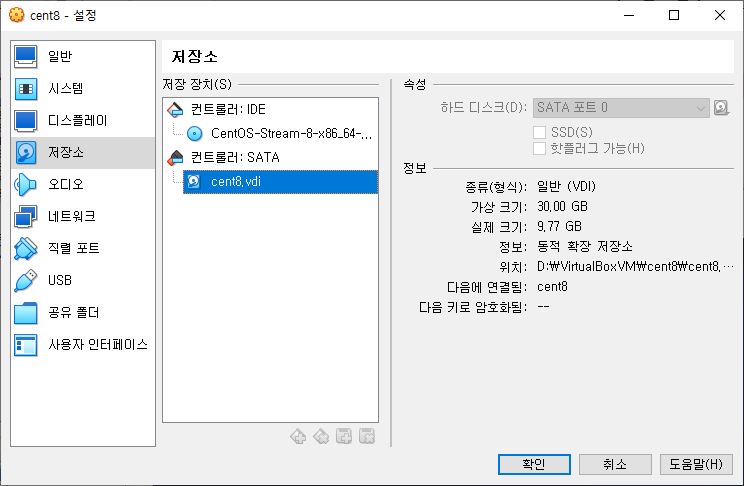
- VM에 접속해서
lsblk명령어로 설치된 디스크(/dev/sda)를 확인해 봅니다.[root@centos8 ~]# lsblkNAME MAJ:MIN RM SIZE RO TYPE MOUNTPOINT sda 8:0 0 30G 0 disk ├─sda1 8:1 0 1G 0 part /boot └─sda2 8:2 0 29G 0 part ├─cs-root 253:0 0 27G 0 lvm / └─cs-swap 253:1 0 2.1G 0 lvm [SWAP] sr0 11:0 1 10.6G 0 rom /run/media/root/CentOS-Stream-8-x86_64-dvd
- VM을 선택하고 “설정 > 저장소” 페이지로 이동. SATA 컨트롤러에 1개의 디스크가 있습니다.
- 가상 하드 디스크 추가 및 확인
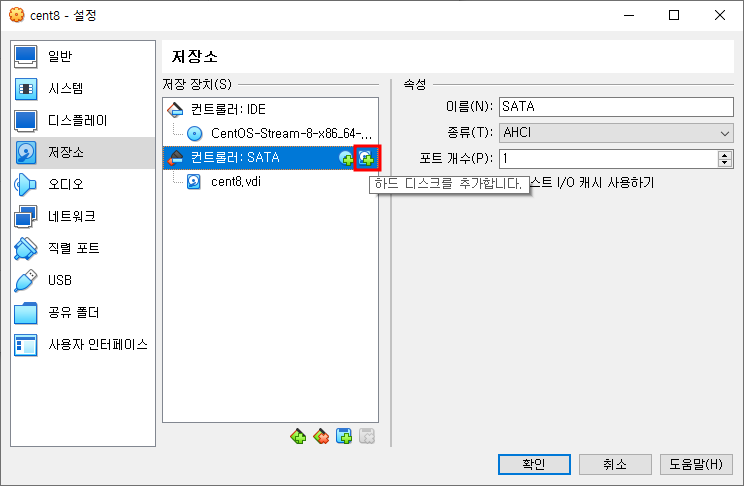
- VM의 종료한 후, “하드 디스크 추가” 버튼을 클릭합니다.
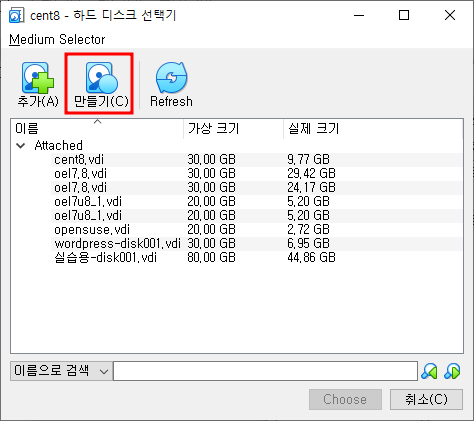
- 하드 디스크 “만들기” 버튼을 클릭합니다.
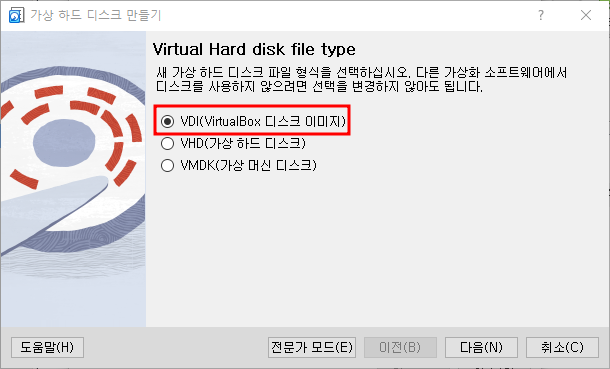
- 가상 하드 디스크이 타입을 선택합니다. 저는 “VDI”를 선택했습니다.
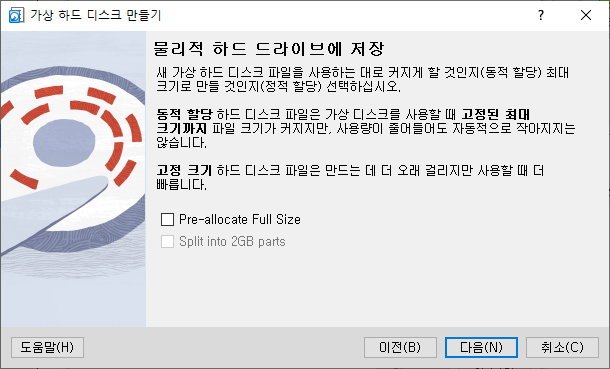
- 가상 하드 디스크를 동적으로 할당할지, 정적으로 할당할지 선택합니다.
“Pre-allocate Full Size”를 체크하지 않으면 동적으로 할당됩니다.
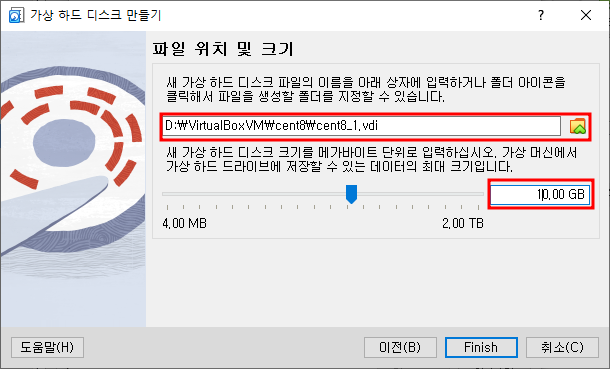
- 가상 하드 드스크의 저장 위치 및 크기를 선택합니다.
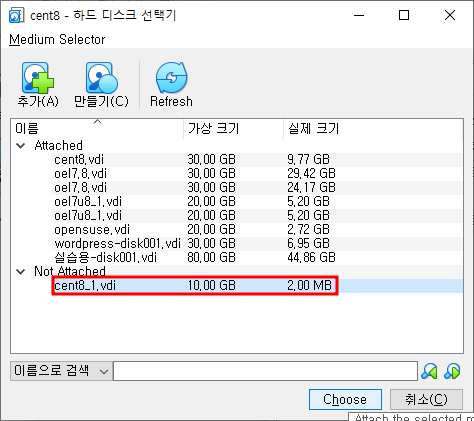
- 가상 하드 디스크의 생성이 완료되면 선택합니다.
저장소에 추가된 가상 하드 디스크를 확인합니다.
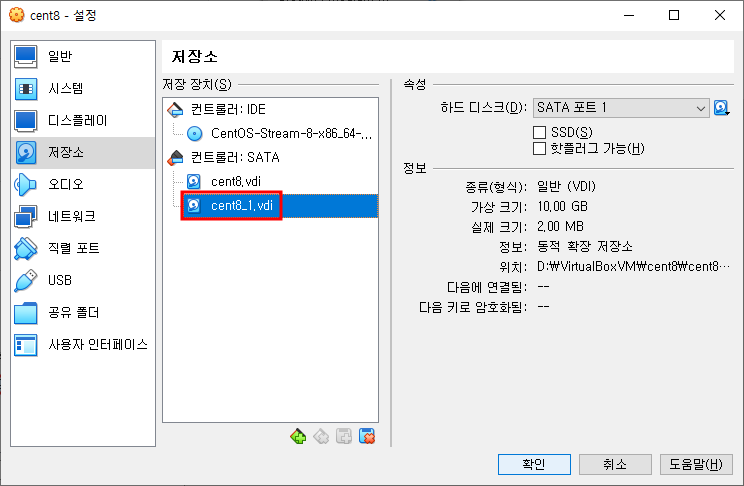
- VM을 시작한 후, 추가한 하드 디스크(/dev/sdb)를 확인합니다.
[root@centos8 ~]# lsblkNAME        MAJ:MIN RM  SIZE RO TYPE MOUNTPOINT
sda           8:0    0   30G  0 disk
├─sda1        8:1    0    1G  0 part /boot
└─sda2        8:2    0   29G  0 part
  ├─cs-root 253:0    0   27G  0 lvm  /
  └─cs-swap 253:1    0  2.1G  0 lvm  [SWAP]
sdb           8:16   0   10G  0 disk
sr0          11:0    1 10.6G  0 rom  /run/media/root/CentOS-Stream-8-x86_64-dvd
- VM의 종료한 후, “하드 디스크 추가” 버튼을 클릭합니다.
- 디스크 파티션 생성
fdisk명령어로 하드 디스크를 초기화하고 및 파티션를 생성할 수 있습니다.[root@centos8 ~]# fdisk /dev/sdb[root@centos8 ~]# fdisk /dev/sdb Welcome to fdisk (util-linux 2.32.1). Changes will remain in memory only, until you decide to write them. Be careful before using the write command. Device does not contain a recognized partition table. Created a new DOS disklabel with disk identifier 0x268e2a23. Command (m for help): m Help: DOS (MBR) a toggle a bootable flag b edit nested BSD disklabel c toggle the dos compatibility flag Generic d delete a partition F list free unpartitioned space l list known partition types n add a new partition p print the partition table t change a partition type v verify the partition table i print information about a partition Misc m print this menu u change display/entry units x extra functionality (experts only) Script I load disk layout from sfdisk script file O dump disk layout to sfdisk script file Save & Exit w write table to disk and exit q quit without saving changes Create a new label g create a new empty GPT partition table G create a new empty SGI (IRIX) partition table o create a new empty DOS partition table s create a new empty Sun partition table Command (m for help):- 신규 파티션을 추가하기 위해 “n” 명령어를 입력합니다. 5GB를 가진 2개의 파티션을 생성하겠습니다.
Command (m for help): nPartition type
   p   primary (0 primary, 0 extended, 4 free)
   e   extended (container for logical partitions)
Select (default p):

Using default response p.
Partition number (1-4, default 1):
First sector (2048-20971519, default 2048):
Last sector, +sectors or +size{K,M,G,T,P} (2048-20971519, default 20971519): +5G

Created a new partition 1 of type 'Linux' and of size 5 GiB.Command (m for help): nPartition type
   p   primary (1 primary, 0 extended, 3 free)
   e   extended (container for logical partitions)
Select (default p):

Using default response p.
Partition number (2-4, default 2):
First sector (10487808-20971519, default 10487808):
Last sector, +sectors or +size{K,M,G,T,P} (10487808-20971519, default 20971519):

Created a new partition 2 of type 'Linux' and of size 5 GiB.
- 생성된 파티션을 확인하기 위해서는 “p” 명령어를 입력합니다. 2개의 파티션이 생성된 것을 확인할 수 있습니다.
Command (m for help): pDisk /dev/sdb: 10 GiB, 10737418240 bytes, 20971520 sectors
Units: sectors of 1 * 512 = 512 bytes
Sector size (logical/physical): 512 bytes / 512 bytes
I/O size (minimum/optimal): 512 bytes / 512 bytes
Disklabel type: dos
Disk identifier: 0x268e2a23

Device     Boot    Start      End  Sectors Size Id Type
/dev/sdb1           2048 10487807 10485760   5G 83 Linux
/dev/sdb2       10487808 20971519 10483712   5G 83 Linux
- 생성된 파티션을 저장하고 쉘 프롬프트로 돌아오기 위해 “w” 명령어를 입력합니다.
Command (m for help): wThe partition table has been altered.
Calling ioctl() to re-read partition table.
Syncing disks.
lsblk -f명령어로 디스크에 생성된 파티션의 파일 시스템 타입(FSTYPE)과 마운트 포인트를 확인할 수 있습니다.
/dev/sdb에 생성된 파티션(sdb1, sdb2)에는 아직 파일 시스템 타입(FSTYPE)과 마운트 포인트가 없습니다.[root@centos8 ~]# lsblk -fNAME FSTYPE LABEL UUID MOUNTPOINT sda ├─sda1 xfs b1bd24ba-cfac-49c8-9636-680808bda35e /boot └─sda2 LVM2_member AOBiCt-qK9S-mnH4-Vt1A-mqRe-4zWP-WeklXw ├─cs-root xfs 79ec5288-5a91-489d-bb11-2d76d674157b / └─cs-swap swap 3c4e5a64-c5c3-417f-b937-bfd324377227 [SWAP] sdb ├─sdb1 └─sdb2 sr0 iso9660 CentOS-Stream-8-x86_64-dvd 2022-05-13-16-37-52-00 /run/media/root/CentOS-Stream-8-86_64-dvd
- “/dev/sdb1″과 “/dev/sdb2″에 파일 시스템 생성
mkfs -t {FSTYPE} 장치명명령어로 파일 시스템을 생성할 수 있습니다.[root@centos8 ~]# mkfs -V -t xfs /dev/sdb1mkfs from util-linux 2.32.1 mkfs.xfs /dev/sdb1 meta-data=/dev/sdb1 isize=512 agcount=4, agsize=327680 blks = sectsz=512 attr=2, projid32bit=1 = crc=1 finobt=1, sparse=1, rmapbt=0 = reflink=1 bigtime=0 inobtcount=0 data = bsize=4096 blocks=1310720, imaxpct=25 = sunit=0 swidth=0 blks naming =version 2 bsize=4096 ascii-ci=0, ftype=1 log =internal log bsize=4096 blocks=2560, version=2 = sectsz=512 sunit=0 blks, lazy-count=1 realtime =none extsz=4096 blocks=0, rtextents=0- `mke2fs` 명령어로 파일 시스템을 생성할 수 있습니다.
“/etc/mke2fs.conf” 파일에 설정된 값을 사용해서 ext2, ext3, ext4 등의 파일 시스템을 생성합니다.
-j 옵션: 저널링 파일 시스템을 ext3로 생성합니다.[root@centos8 ~]# mke2fs -j /dev/sdb2mke2fs 1.45.6 (20-Mar-2020) Creating filesystem with 1310464 4k blocks and 327680 inodes Filesystem UUID: c34b4d75-80f2-4a11-a1df-671ea6652348 Superblock backups stored on blocks: 32768, 98304, 163840, 229376, 294912, 819200, 884736 Allocating group tables: done Writing inode tables: done Creating journal (16384 blocks): done Writing superblocks and filesystem accounting information: done lsblk -f명령어로 “/dev/sdb” 디스크에 생성된 파티션의 파일 시스템 타입(FSTYPE)을 다시 확인해 봅니다.[root@centos8 ~]# lsblk -fNAME FSTYPE LABEL UUID MOUNTPOINT sda ├─sda1 xfs b1bd24ba-cfac-49c8-9636-680808bda35e /boot └─sda2 LVM2_member AOBiCt-qK9S-mnH4-Vt1A-mqRe-4zWP-WeklXw ├─cs-root xfs 79ec5288-5a91-489d-bb11-2d76d674157b / └─cs-swap swap 3c4e5a64-c5c3-417f-b937-bfd324377227 [SWAP] sdb ├─sdb1 xfs a3a3a40b-9669-4810-8209-e3c8ab8f29d7 └─sdb2 ext3 c34b4d75-80f2-4a11-a1df-671ea6652348 sr0 iso9660 CentOS-Stream-8-x86_64-dvd 2022-05-13-16-37-52-00 /run/media/root/CentOS-Stream-8-x86_64-dvd
- 파일 시스템 무결성 검사
fsck,fsck.ext3,xfs_repair등의 명령어를 사용해서 언마운트(umount)된 파일 시스템의 무결성을 검사하고 오류도 수정할 수 있습니다.- xfs 파일 시스템 타입을 가지고 있는 “/dev/sdb1” 파티션은
xfs_repair명령어로 검사를 합니다.[root@centos8 ~]# xfs_repair /dev/sdb1Phase 1 - find and verify superblock... Phase 2 - using internal log - zero log... - scan filesystem freespace and inode maps... - found root inode chunk Phase 3 - for each AG... - scan and clear agi unlinked lists... - process known inodes and perform inode discovery... - agno = 0 - agno = 1 - agno = 2 - agno = 3 - process newly discovered inodes... Phase 4 - check for duplicate blocks... - setting up duplicate extent list... - check for inodes claiming duplicate blocks... - agno = 0 - agno = 1 - agno = 2 - agno = 3 Phase 5 - rebuild AG headers and trees... - reset superblock... Phase 6 - check inode connectivity... - resetting contents of realtime bitmap and summary inodes - traversing filesystem ... - traversal finished ... - moving disconnected inodes to lost+found ... Phase 7 - verify and correct link counts... done - ext3 파일 시스템 타입을 가지고 있는 “/dev/sdb2” 파티션은
fsck명령어로 검사를 합니다.[root@centos8 ~]# fsck -t ext3 -V /dev/sdb2fsck from util-linux 2.32.1 [/usr/sbin/fsck.ext3 (1) -- /dev/sdb2] fsck.ext3 /dev/sdb2 e2fsck 1.45.6 (20-Mar-2020) /dev/sdb2: clean, 11/327680 files, 39535/1310464 blocksfsck명령어 옵션 -a: 발생한 에러를 사용자 확인절차 없이 자동으로 처리 -r: 복구할 때 사용자 확인 절차 -y: 파일시스템의 문제를 발견하였을 때 자동적으로 수정. 모든 질문에 yes로 대답 -n: 어떤 문제가 있을 때 이를 수정하지 않고, 문제점을 출력한다. -s : 대화형 모드에서 여러 파일 시스템을 점검할 때 fsck 동작을 시리얼화 함 -A: /etc/fstab에 정의된 모든 파일 시스템 점검 -P: -A옵션과 함께 사용할 때 루트 파일시스템과 그 외 파일시스템을 병렬로 점검 -R: -A옵션과 함께 사용할 때 루트 파일시스템의 점검을 제외 -N: 실제로 실행하지는 않고 작업 내용을 출력 -b 슈퍼블록: 슈퍼블록으로 지정한 백업 슈퍼블록을 사용 -f: 무조건 검사, fsck는 기본적으로 파일시스템에 이상이 없다고 판단하면 검사하지 않는다 -V: 점검상황을 자세히 설명
- 파일 시스템 마운트
mount명령어를 사용해서 파일 시스템을 특정 디렉터리에 마운팅합니다.[root@centos8 mnt]# mount -t xfs /dev/sdb1 /home/jeus [root@centos8 mnt]# lsblkNAME MAJ:MIN RM SIZE RO TYPE MOUNTPOINT sda 8:0 0 30G 0 disk ├─sda1 8:1 0 1G 0 part /boot └─sda2 8:2 0 29G 0 part ├─cs-root 253:0 0 27G 0 lvm / └─cs-swap 253:1 0 2.1G 0 lvm [SWAP] sdb 8:16 0 10G 0 disk ├─sdb1 8:17 0 5G 0 part /home/jeus └─sdb2 8:18 0 5G 0 part sr0 11:0 1 10.6G 0 rom /run/media/root/CentOS-Stream-8-x86_64-dvdmount명령어 옵션 -a: /etc/fstab 파일에 정의된 모든 파일 시스템 마운트 -t: 파일시스템 타입 지정(생략하면 -t ext4), "-t no+fs타입1,fs타입2"을 지정하면 제외 -o: 마운트 옵션 지정, 아래 [#4 필드 옵션] 참고 -f: 마운트할 수 있는지 점검만 한다 -r: -o ro와 동일 -w: -o rw와 동일 -v: 자세한 정보 출력 -n: /etc/mtab 파일을 변경하지 않고 마운트- 별도 옵션(-n) 없이 마운팅하면 “/etc/mtab” 파일에 등록됩니다. 부팅 시에도 자동 마운팅하려면 “/etc/fstab” 파일에 수작업으로 등록합니다.
"/etc/mtab" 파일과 "/etc/fstab" 파일의 필드 설명 #1 필드 : 장치명 #2 필드 : 마운트 포인트 #3 필드 : 파일 시스템의 종류 #4 필드 : 파일 시스템의 속성을 지정하는 옵션 #5 필드 : 덤프 여부, 0이면 백업되지 않고 1이면 백업을 위한 dump 명령 사용 가능 #6 필드 : 부팅 시 파일시스템 점검 순서, 루트 파일시스템은 1을 지정, 나머지는 2를 지정, 0을 지정하면 부팅할 때
fsck명령어로 점검하지 않는다. [#4 필드 옵션] defaults: rw, nouser, auto, exec, suid auto: 부팅 시 자동 마운트 exec: 실행 파일의 실행 허용 suid: setuid, setgid 사용 허용 ro: 읽기 전용 rw: 읽기 쓰기 가능 user: 일반 사용자도 마운트 가능 noauto: 부팅 시 자동 마운트하지 않음 noexec: 실행 파일의 실행 불가 nosuid: setuid, setgid 사용 불가 nouser: root만 마운트 가능 usrquota: 사용자별 디스크 쿼더 설정 가능 grpquota: 그룹별 디스크 쿼더 설정 가능
- 언마운트 후 다시 마운트하기
umount명령어로 마운트를 해제할 수 있습니다.[root@centos8 ~]# umount /dev/sr0 [root@centos8 ~]# mount -t iso9660 -o ro /dev/sr0 /mnt/cdrom [root@centos8 ~]# lsblkNAME MAJ:MIN RM SIZE RO TYPE MOUNTPOINT sda 8:0 0 30G 0 disk ├─sda1 8:1 0 1G 0 part /boot └─sda2 8:2 0 29G 0 part ├─cs-root 253:0 0 27G 0 lvm / └─cs-swap 253:1 0 2.1G 0 lvm [SWAP] sdb 8:16 0 10G 0 disk ├─sdb1 8:17 0 5G 0 part /home/jeus └─sdb2 8:18 0 5G 0 part sr0 11:0 1 10.6G 0 rom /mnt/cdromumount명령어 옵션 -a: /etc/mtab에 설정된 모든 파일시스템을 언마운트 -t fs타입 : 지정된 파일시스템 타입만 언마운트 -l: 장치의 사용이 끝날때 까지 대기 후 제거 -f: 강제 언마운트 -v: 정보 출력 -n: /etc/mtab 파일을 변경하지 않고 마운트를 해제


