[Sangfor HCI]Disaster Recovery 설명(YouTube자막)
Sangfor aCloud backup and disaster recovery solution
To cope with a variety of issues that might occur in data centers such as system failure, hacker attacks and natural disasters.
Sangfor offers a complete disaster recovery solution based on aCloud, the industry-leading hyper-converged infrastructure platform.
The DR solution can be realized with only two aCloud platforms that can communicate with each other.
The communication link between the two sites can be dark fibre, leased line or a stable internet VPN connection.
Compute, storage, networking and security resources can be quickly and easily constructed with x86 servers and layer 2
switches in the business dome.
Redundant network architecture is used for storage, VXLAN, business and management to avoid single point of failure and provide high availability.
External storage can be attached and serve as a local backup repository to ensure data integrity.
A highly available environment is deployed on the secondary site in the same network architecture.
Not only can the two data centers run businesses concurrently but also provide bi-directional protection for each other.
The aCloud DR solution is designed in a local backup plus off-site DR structure.
Every VM does backup locally and then replicates to a secondary site to make sure the protected data has the duplicate in the local backup repository.
When the link has been returned to normal after a failure, data can be accessed from the local backup and continuously replicates to the secondary site from the breakpoint.
Scheduled backup can support hourly, daily and weekly intervals while CDP offers real-time backup to achieve zero data loss.
When a single VM is down or the aCloud platform fails, recovery is prioritized from a local backup to reduce time and simplify the process.
When the primary data center is down, business is switched over to a secondary data center for recovery.
Business can be migrated back to the primary site with one-click.
Highlights of the Sangfor aCloud disaster recovery solution include support:
- An instant recovery from local backup.
- Configurable RPO(Recovery Point Objective) is ranging from one second to one-week.
- RTO(Recovery Tim Objective) reduces to minutes with a minimum of two minutes.
- Fail back to primary site with one-click with only Delta data migrated to backup
- File level recovery for Windows VMs.
- DR integrated with the platform and extremely easy to operate
- Visualised DR monitoring : making DR management and monitoring a piece of cake.
- Standby aCMP to facilitate high availability management
- Continuous backup from break point with encrypted and compressed transmission to ensure data integrity.
- Self defined link bandwidth for DR to avoid any interference with production traffic.
Now let’s take a look at how Sangfor aCloud DR works in real world scenarios.
First, let’s get the environment set up.
On the aCMP homepage, go to “Resources”, add two clusters to two availability zones..
One as primary and the other as secondary.
DR plan configuration
The aCloud platform provides a configuration wizard to help users configure a comprehensive DR plan in five easy steps.
First, create a DR plan.
On the aCloud platform, add the previously configured AZ’s two sites and then select “Create DR Plan” window and add “Name”, “Primary and Secondary Site” and “Protected VM(s)”.
“RPO”‘s ranging from one second to one week and “Compressed” replication are supported.
Select CDP for local backup to realize second-level RPO.
The backup retention period is also customizable.
Configure the network for a secondary site in advance to facilitate fast business recovery in the event of failure.
The what you draw is what you get structure radically simplifies network operations on aCloud.
The network topographies of the primary site and the secondary site are displayed side by side to simplify management.
When the DR plan starts, a backup is created at the primary site immediately
Scenario 1: Accidentally delete files and recover from local backup.
Go to the “Cluster” and find the demo VM in the primary site.
After entering the “Console”, notice that a text file has already been created on the desktop for the demonstration.
Let’s delete it and empty the recycle bin.
Don’t worry if you accidentally delete files on aCloud.
The backup helps you easily recover files
With CDP real-time backup, a recovery point is created every second.
In the time display, find the point of the timeline before file deletion.
Open the folder and download the files successfully to the local Drive.
CDP helps with fast recovery of accidentally deleted files.
Scenario 2: VM failure, recover the whole VM from local backup
Once again let’s go to the VM console and delete the file then click recover at the primary site for this VM.
aCloud provides two types of local recovery approaches: “Create New Virtual Machine” and “Overwrite Existing Virtual Machine”
Creation of a new virtual machine is recommended to eliminate any influence over existing VMs.
If you log in to the recovered VM, you’ll find the deleted file is right on the desktop.
Scenario 3: Planned maintenance at production site, failover to the DR site
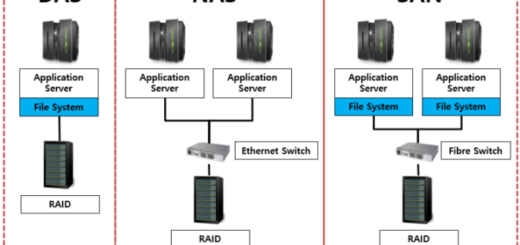
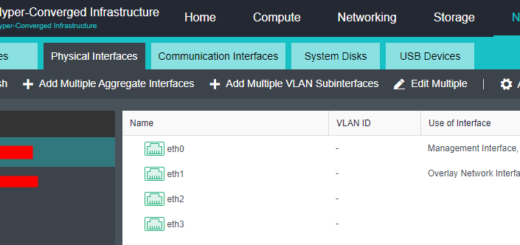
By clicking “Edit” on the “Windows_VM”, we find that this VM is bridged to the eth0 with an IP ending with 110 and is reachable by ping instruction.
If the primary site requires maintenance we can use planned recovery to rapidly migrate business to the secondary site.
Go to “Disaster Recovery” and on the “Backups on Secondary Site” click “Recovery” and choose “Planned Recovery”.
The VM on the primary site will be shutdown automatically and pulled up on the secondary site.
During this switchover, the VM is not reachable for a very short time and can be pinged through again as soon as it’s powered on at the secondary site
This entire process takes a maximum of two minutes.
Scenario 4: When production maintenance ends, migrate back to production site.
After maintenance is complete on the primary site, we need to migrate business back to the primary site from the secondary site.
On the “Disaster Recovery” interface, go to “Backups on Secondary Site” and click “Migrate to Primary Site”.
The VM is migrated back to the primary site with only Delta data transmitted over the wire to save bandwidth and time.
The migration process can be monitored on the “Tasks” window.
It takes less than two minutes to successfully migrate the VM back to the primary site from the secondary site, minimizing business downtime.
Scenario 5: Datacenter failure and failover to the DR site.
First, let’s power off the demo VM to simulate a data center power failure.
Go to the backups on the secondary site, click “(Disaster) Recover” then choose “Recovery after Disaster” and the backup
point, click ‘Recover”, and failover takes place right away.
The whole process takes no more than one minute.
After the VM has successfully failed over to the secondary site, it can once again be accessed.
Sangfor technologies, your 1-stop solution vendor for cloud computing and network security